Unraveling the Labyrinth: A Comprehensive Guide to Lordran’s Map in Dark Souls
Related Articles: Unraveling the Labyrinth: A Comprehensive Guide to Lordran’s Map in Dark Souls
Introduction
With great pleasure, we will explore the intriguing topic related to Unraveling the Labyrinth: A Comprehensive Guide to Lordran’s Map in Dark Souls. Let’s weave interesting information and offer fresh perspectives to the readers.
Table of Content
Unraveling the Labyrinth: A Comprehensive Guide to Lordran’s Map in Dark Souls

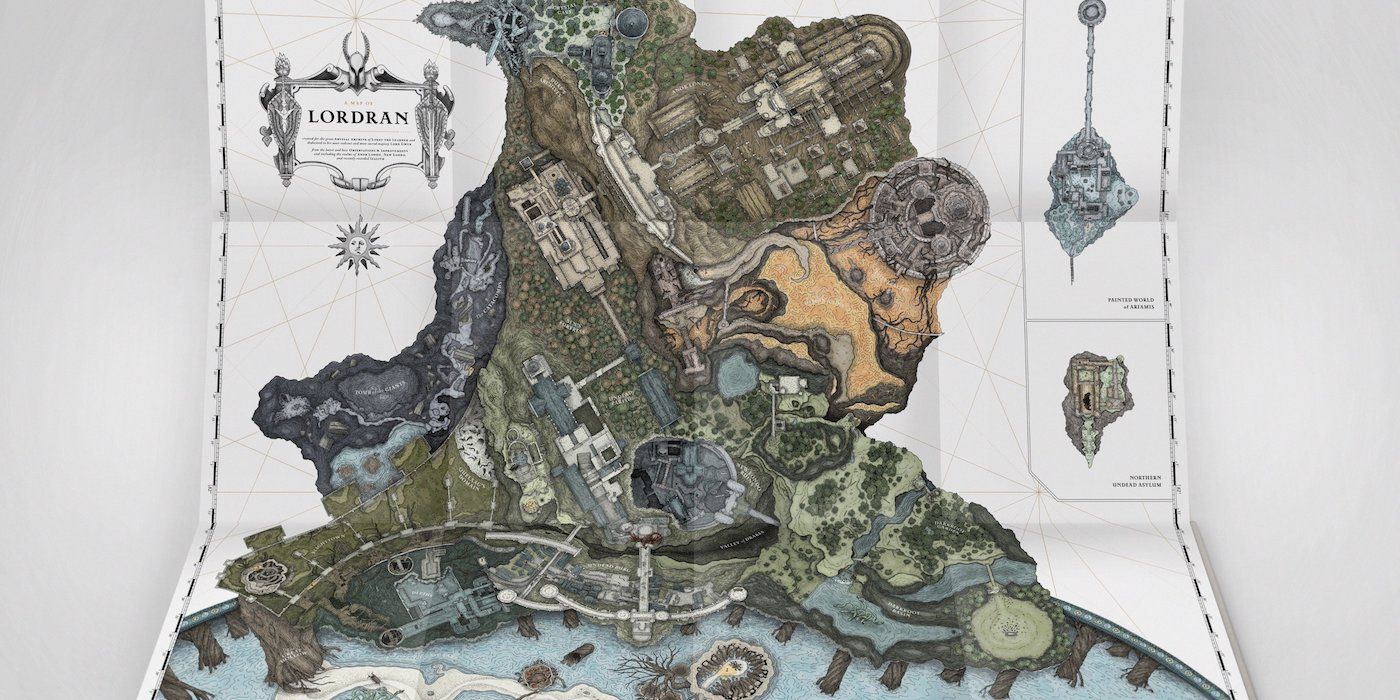
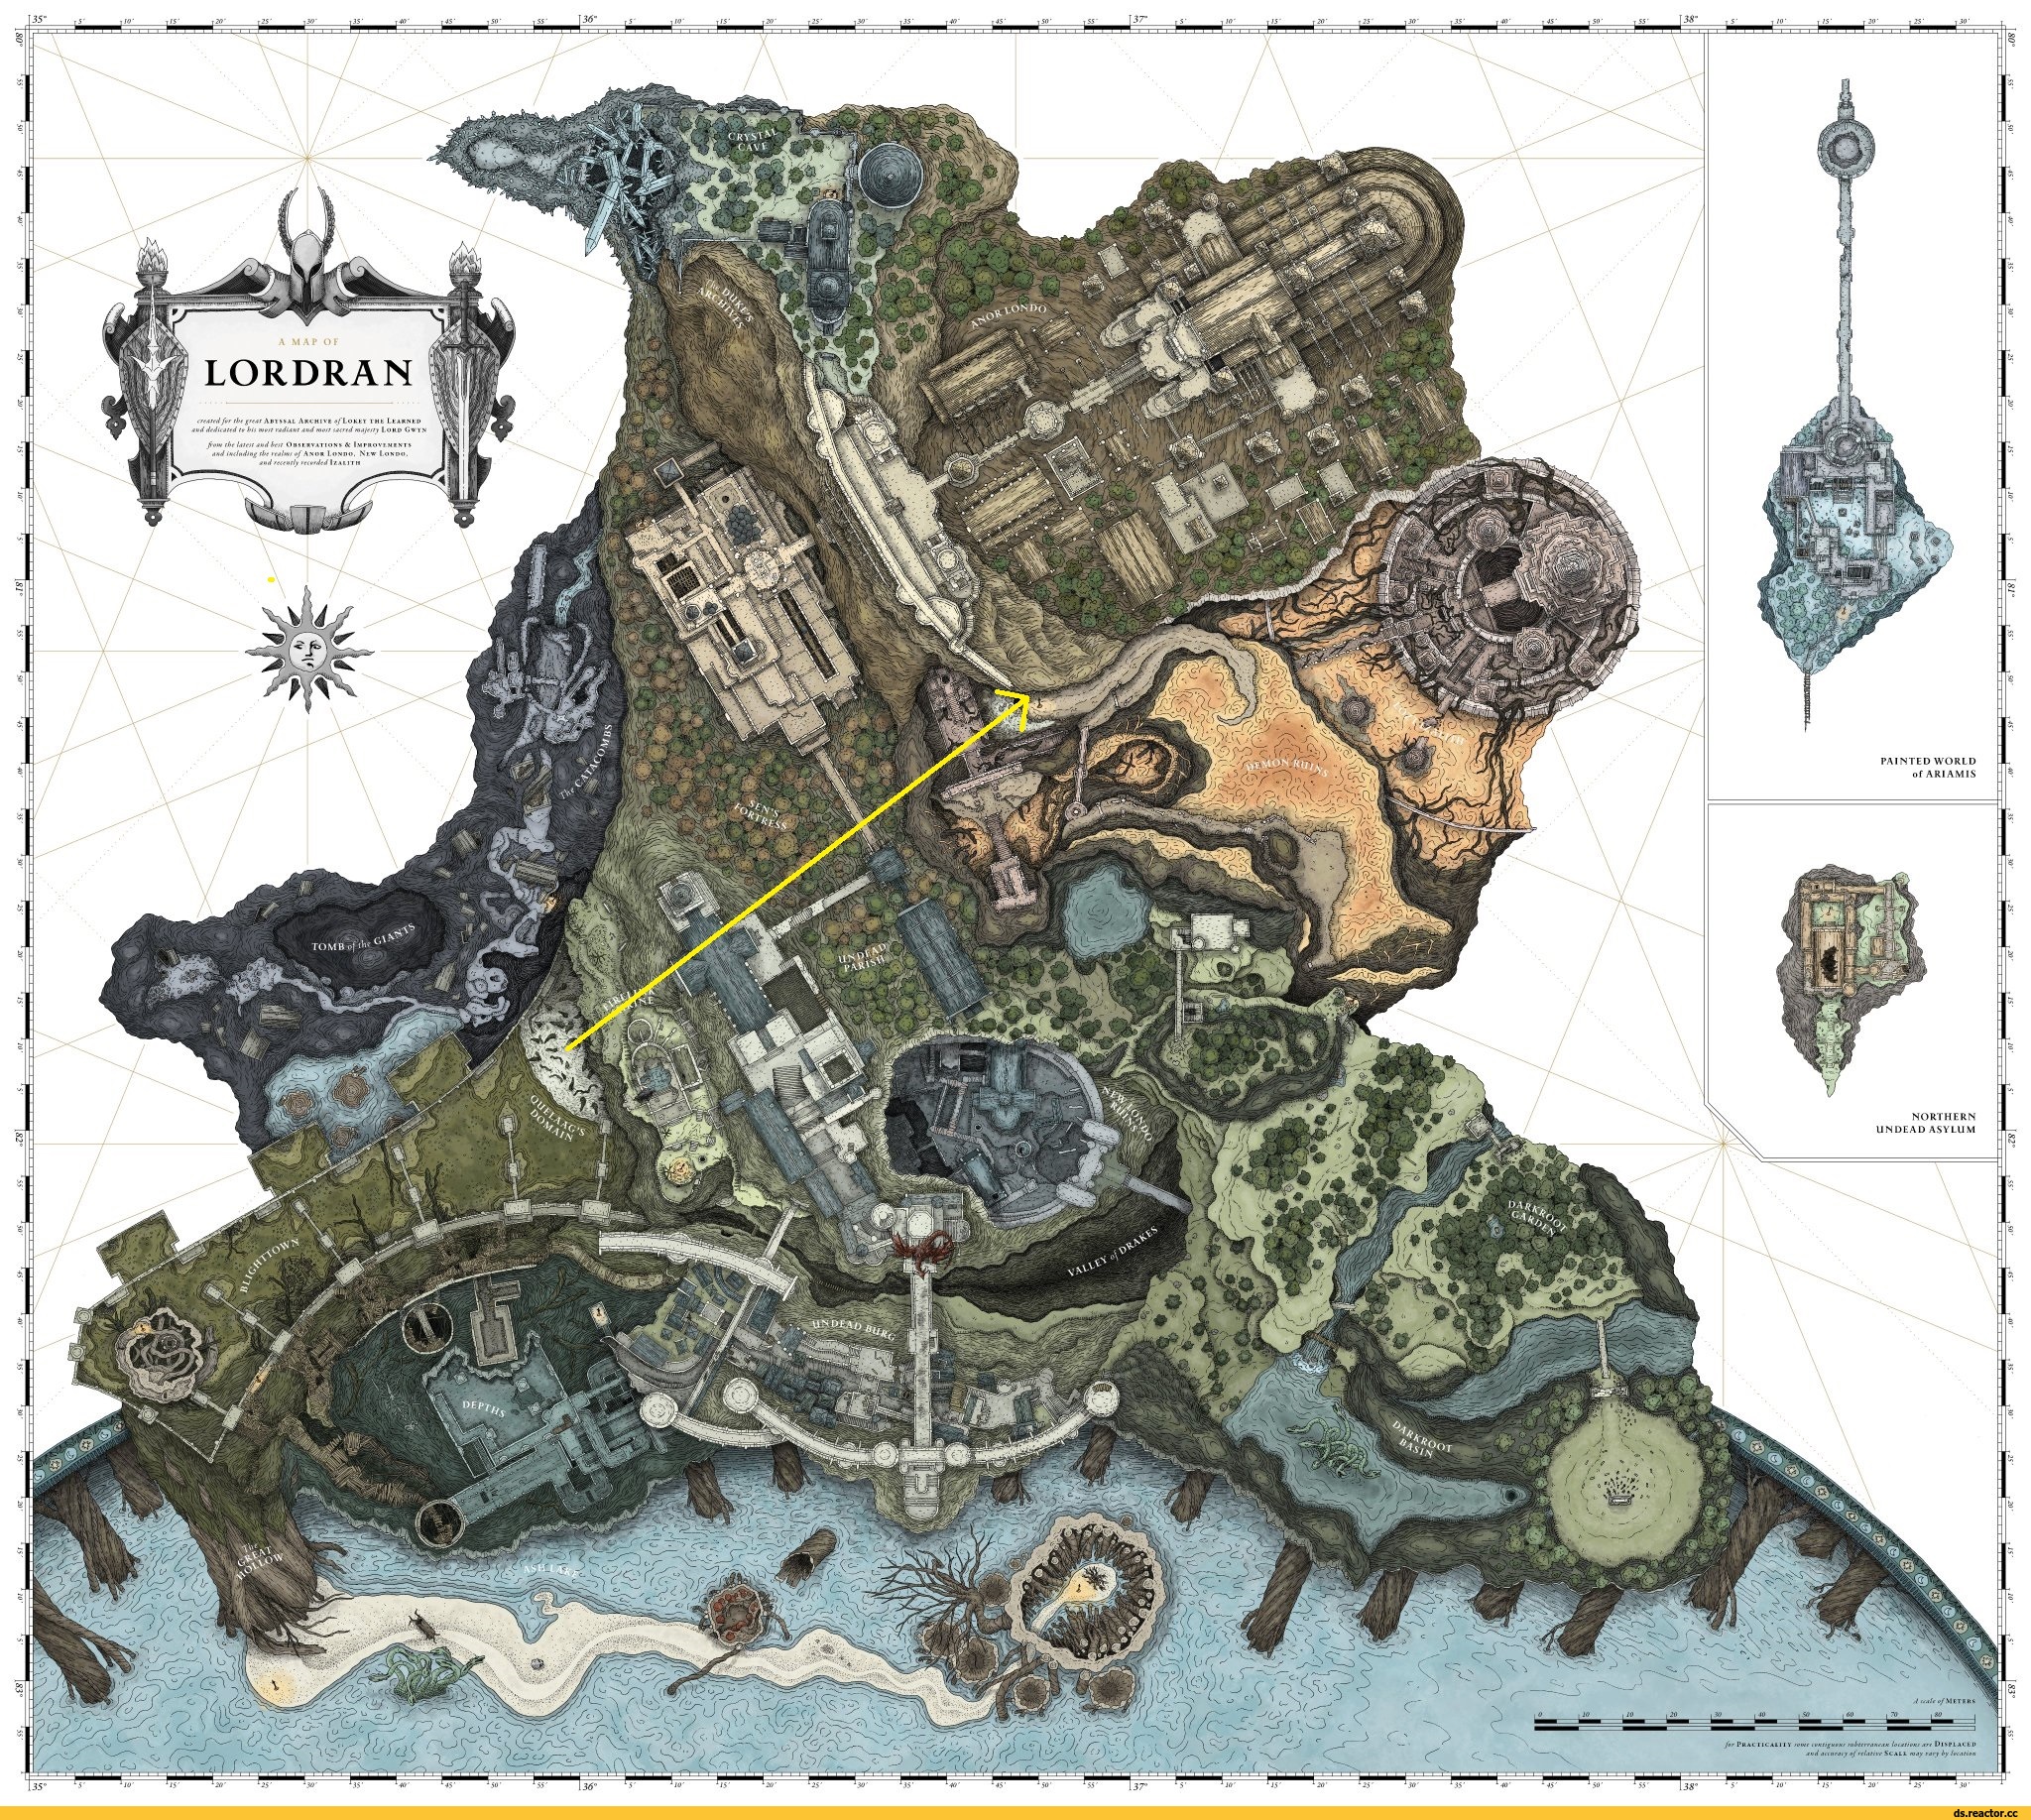
The world of Lordran, as presented in the seminal action role-playing game Dark Souls, is a testament to intricate level design and masterful world-building. At the heart of this captivating experience lies the intricate map of Lordran, a sprawling and interconnected network of diverse environments, formidable foes, and hidden secrets. Understanding this map is crucial for navigating the perilous journey of a Dark Souls player, providing a foundation for exploring its depths and unraveling its mysteries.
A Realm of Interconnectedness:
Lordran’s map is far more than a simple visual representation of the game’s world. It’s a complex tapestry woven with subtle connections and hidden pathways, each location influencing the others in a delicate balance. This interconnectedness is a defining feature of Dark Souls, encouraging exploration and rewarding players with a sense of discovery.
Key Locations and Their Significance:
1. The Undead Asylum:
This initial area serves as a harsh introduction to the world of Lordran, setting the stage for the player’s journey as a cursed Undead. The Asylum’s stark architecture and imposing enemies foreshadow the challenges that lie ahead.
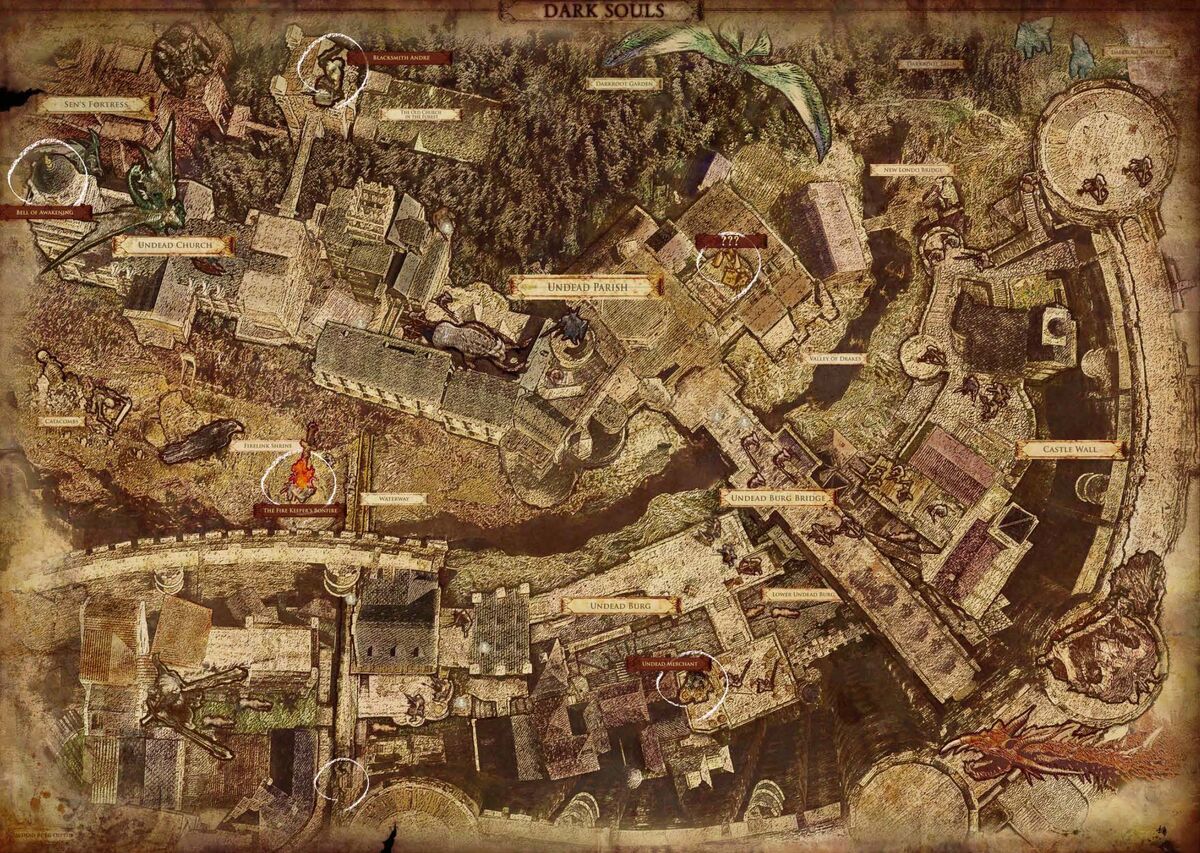
2. Firelink Shrine:
This central hub acts as a sanctuary and a point of departure for exploring Lordran’s diverse regions. The Shrine provides access to essential services like merchants, blacksmiths, and a bonfire, a crucial point for restoring health and summoning allies.
3. Undead Burg:
A bustling, yet dilapidated, city, the Undead Burg is a challenging introduction to Lordran’s more populated areas. Its winding streets and rooftop paths offer a glimpse into the world’s history and hint at the encroaching darkness.
4. The Parish of the Departed:
This desolate area is home to the grotesque and formidable gargoyles, a formidable challenge for even experienced players. The Parish’s somber atmosphere and haunting architecture foreshadow the world’s descent into despair.
5. Sen’s Fortress:
A sprawling fortress filled with intricate traps and deadly enemies, Sen’s Fortress is a testament to Lordran’s unforgiving nature. Its unforgiving design and challenging puzzles demand patience and skill, rewarding players with a sense of accomplishment.
6. Anor Londo:
A once-glorious city now shrouded in a veil of sorrow, Anor Londo is a testament to the world’s fallen grandeur. Its majestic architecture and imposing knights offer a glimpse into the past, while the city’s present state reflects the encroaching darkness.
7. The Duke’s Archives:
This labyrinthine library, guarded by the formidable Iron Golem, holds secrets of the past and clues to the world’s fate. Its intricate puzzles and hidden passages challenge players to unravel its mysteries.
8. Lost Izalith:
This volcanic wasteland is a testament to the world’s chaotic past, filled with monstrous creatures and a lingering sense of destruction. Its fiery atmosphere and dangerous creatures pose a formidable challenge.
9. New Londo Ruins:
This flooded city, once a bustling metropolis, is now a haunting reminder of the world’s downfall. Its eerie silence and spectral enemies provide a sense of dread and foreboding.
10. The Demon Ruins:
A desolate and treacherous region, the Demon Ruins is filled with monstrous creatures and a lingering sense of chaos. Its fiery atmosphere and dangerous enemies demand cunning and skill.
11. The Catacombs:
A vast network of underground tunnels, the Catacombs are a labyrinth of bone and decay, teeming with undead creatures. Its eerie silence and claustrophobic atmosphere create a sense of unease and tension.
12. The Painted World of Ariamis:
A surreal and dreamlike realm, the Painted World of Ariamis exists outside the boundaries of Lordran, offering a glimpse into the world’s hidden mysteries. Its enchanting atmosphere and unique challenges offer a break from the game’s usual darkness.
The Importance of Mastering Lordran’s Map:
Understanding the intricate connections between Lordran’s diverse locations is crucial for navigating the game’s challenges. The map serves as a roadmap, guiding players through the perilous journey and revealing hidden secrets.
1. Strategic Exploration:
The interconnected nature of Lordran’s map allows players to choose their path, offering a sense of freedom and agency. By understanding the map, players can strategize their approach, prioritizing certain areas and choosing the most efficient route to their destination.
2. Discovering Hidden Secrets:
Lordran’s map is riddled with hidden pathways, secret areas, and optional bosses, rewarding players with a sense of discovery and rewarding their curiosity. By exploring the map thoroughly, players can uncover these hidden treasures and unlock the game’s full potential.
3. Overcoming Challenges:
The map provides crucial information about enemy locations, item placement, and environmental hazards, enabling players to prepare for upcoming challenges. By studying the map, players can strategize their approach, choose the appropriate equipment, and overcome obstacles effectively.
4. Understanding the World’s Lore:
The map serves as a visual representation of Lordran’s history, offering clues to the world’s past and the events that led to its current state. By exploring the map and interacting with its environment, players can piece together the world’s story and unravel its mysteries.
Frequently Asked Questions (FAQs) about Lordran’s Map:
1. How do I access the Painted World of Ariamis?
The Painted World of Ariamis is accessed through a hidden door in the depths of the Undead Burg. This hidden door is located behind a false wall in the area where the player encounters the first gargoyle.
2. What is the best route through Sen’s Fortress?
There is no single "best" route through Sen’s Fortress, as the layout and enemy placement can vary depending on the player’s choices. However, a common strategy is to utilize the fortress’s verticality, using ladders and rooftops to avoid enemies and navigate the treacherous traps.
3. Where can I find the Lordvessel?
The Lordvessel is a crucial item required to access the game’s final area. It is located in the Duke’s Archives, hidden behind a false wall in the area where the player encounters the Iron Golem.
4. What is the significance of the Firelink Shrine?
The Firelink Shrine serves as a central hub, providing access to essential services and allowing players to rest at the bonfire, restoring health and summoning allies. It also acts as a point of departure for exploring Lordran’s diverse regions.
5. What are the benefits of exploring Lordran’s map thoroughly?
Thorough exploration of Lordran’s map offers numerous benefits, including discovering hidden secrets, unlocking optional areas, and gaining a deeper understanding of the world’s lore. It also allows players to strategize their approach to challenges, choose the most efficient route, and maximize their chances of success.
Tips for Navigating Lordran’s Map:
1. Utilize Bonfires:
Bonfires are crucial points for restoring health, summoning allies, and fast traveling between locations. Make sure to activate all bonfires encountered, as they provide valuable checkpoints and shortcuts.
2. Explore Every Nook and Cranny:
Lordran’s map is riddled with hidden pathways, secret areas, and optional bosses. Explore every nook and cranny, as you never know what treasures you might uncover.
3. Pay Attention to the Environment:
The environment provides valuable clues about the world’s history and upcoming challenges. Pay attention to the architecture, the enemies, and the items scattered throughout the world.
4. Use the Map to Your Advantage:
The map provides crucial information about enemy locations, item placement, and environmental hazards. Use it to your advantage, strategizing your approach and choosing the most efficient route.
5. Don’t Be Afraid to Die:
Death is a part of the Dark Souls experience. Don’t be afraid to experiment, try different approaches, and learn from your mistakes. Each death is a learning opportunity, allowing you to adapt and improve your skills.
Conclusion:
Lordran’s map is more than just a visual representation of the game’s world. It’s a complex tapestry of interconnected locations, hidden secrets, and challenging encounters, offering a rewarding and immersive experience for players willing to explore its depths. By understanding the map’s intricate connections, players can navigate the perilous journey, uncover hidden treasures, and unravel the world’s mysteries, ultimately achieving a sense of accomplishment and mastery. Mastering Lordran’s map is not just about finding your way through the world, but about unraveling its secrets and discovering the true depth of its design. It’s a testament to the game’s enduring appeal and a testament to the power of intricate level design in crafting a truly memorable and engaging gaming experience.


Closure
Thus, we hope this article has provided valuable insights into Unraveling the Labyrinth: A Comprehensive Guide to Lordran’s Map in Dark Souls. We appreciate your attention to our article. See you in our next article!